The 12 Projects of Christmas 2023: Project #4 Box Card
- Amy Rich
- Oct 31, 2023
- 3 min read
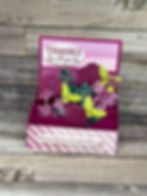
When I opened my October Paper Pumpkin Kit and spread out the pieces, I knew the type of card I wanted to make. I had pinned a card by Kris Breach that I knew would be perfect. It's a box card!


I will walk you through the process of putting this card together using a series of still photos from my video tutorial. Let's start with the slanted side pieces, which for my card are two pieces 2 3/8" x 2", scored on one side at 3/8", making the main part of the side 2" x 2". I laid them next to each other so the 3/8" scored sides faced the outsides of my desk.
For the piece on the left, I measured 1" down from the upper right corner and made a tick mark (pictured). For the piece on the right, I measured 1" down from the upper left corner and made a tick mark.

Then I cut two pieces of O Holy Night Designer Series Paper measuring 1 3/4" x 1 3/4". Laying them side by side, I made tick marks down 7/8" from the upper right (on the piece on the left) and from the upper left (on the piece on the right).

For the two plain cardstock pieces, I cut from the top of the score line to the tick mark, and for the two Designer Series Paper pieces, I cut from the upper corner at an angle to the tick mark. The pieces then looked like this:

I layered the Designer Series Paper pieces to the cardstock pieces.

I adhered the outsides of the plain 3/8" sections to a card base that measures 3 1/2" x 4 1/4". This made a little gate on the card.

I cut apart one of the cards from the October Paper Pumpkin kit so that it measures 3 1/4" x 4" and fits nicely on the card base. I then adhered a piece of 4 1/4" x 1" Designer Series Paper, scored 3/8" from each end. After folding the left edge back, I adhered that to the left side of the gate.

Next up were three pieces of Night of Navy cardstock, measuring 4 1/4" x 3/4", scored, again, 3/8" from each end. I started by angle cutting each end of all three pieces.

I adhered those three strips, one at a time, just to the left gate. You can see my process in the photos below.


When I folded them all to the inside, they look like little stair steps.

I added liquid glue to the flaps on the right side of these strips...

...then folded the right gate over the glue.

This created amazing stair steps, which were ready for decoration.

But first, I needed to swing the front panel into place and adhere it to the right gate.

Pieces from the Paper Pumpkin kit were perfect for decorating the "stairs." It's what drew me to this design in the first place, and now I can't stop looking at the finished product. And if you look closely, you can see I also used the glitter glue from the kit to finish off the snow on the houses and trees.
I put a 3 1/4" x 4" Basic White panel on the back of the card to write my message.

Oh, and one of the best parts? It folds down to fit in an envelope. SO COOL!

Step by step video tutorials are sometimes easier to follow. you can watch that here:
But wait! There's more! Check out the other two cards like this I put together. The first one uses the Timeless Charm stamp set and retired dies.


And this one uses the Brewed for You stamp set and Brewed Dies. I kinda love how this one turned out, too.


Fun fold cards are my jam, and boy, do I love these. Thanks for joining me for Project #4 of The 12 Projects of Christmas 2023!
Happy stamping!
Amy